Creating a Class Account on KidBlog
for TEACHERS
1. Go to www.kidblog.org.
2. Once you are on the KidBlog site, click on the big orange button that
looks like this:
2. Once you are on the KidBlog site, click on the big orange button that
looks like this:

3. Fill out the "Create Your Free KidBlog Class" form
4. You can begin to customize your class blog at this point, but make sure to click on the link in the confirmation
e-mail you will receive from kidblog to make your account active.
5. On the Dashboard menu bar click on Settings. Then click on the General tab. This screen has some very important
information:
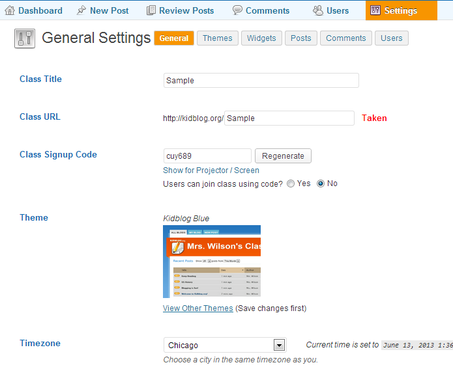
6. You will need to make note of the Class Title, Class URL, and Class Signup Code. You will need this information to
link your class to other classes so your students can collaborate with them. Make sure to set your Timezone as well.
7. Select your Theme for your blog to make it a bit more personal. You can do this by clicking on the Theme tab next to
the General tab.
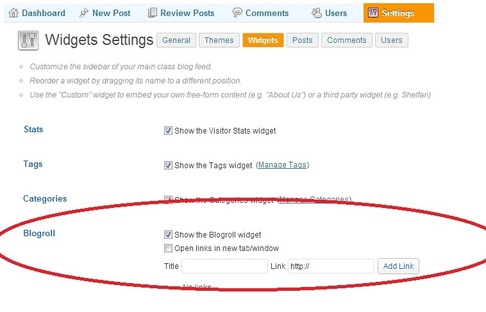
8. Once your partner teacher has set up his/her KidBlog account you will need to add his/her class to your blogroll so
that your classes will be able to see each others poststhe other class' posts. You will exchange the Class Title, and
Class URL information found under the General tab, and input it where it says Blogroll.
link your class to other classes so your students can collaborate with them. Make sure to set your Timezone as well.
7. Select your Theme for your blog to make it a bit more personal. You can do this by clicking on the Theme tab next to
the General tab.
8. Once your partner teacher has set up his/her KidBlog account you will need to add his/her class to your blogroll so
that your classes will be able to see each others poststhe other class' posts. You will exchange the Class Title, and
Class URL information found under the General tab, and input it where it says Blogroll.
9. Next, you will need to set the settings for reading posts. Click on the Posts tab and make sure the following things are
selected:
selected:
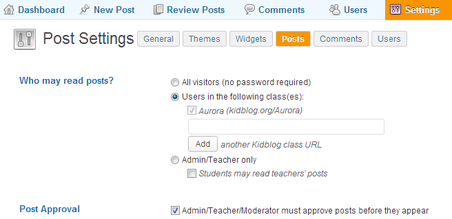
Next to the heading "Who may read posts?" you should select "Users in the following class(es)." In the box below that, you will need to fill it in with the URL of the class(es) you will be collaborating with.
Please make sure to check the box next to "Post Approval." All posts must be approved by teachers before they are made viewable by all participants.
10. Next, you will need to set the settings for commenting on posts. Click on the Comments tab and make sure the
following things are selected:
Please make sure to check the box next to "Post Approval." All posts must be approved by teachers before they are made viewable by all participants.
10. Next, you will need to set the settings for commenting on posts. Click on the Comments tab and make sure the
following things are selected:
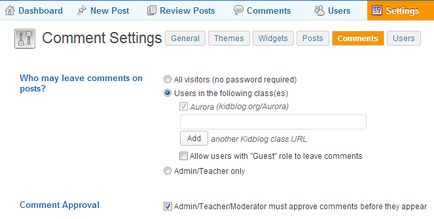
Next to the heading "Who may leave comments on posts?" you should select "Users in the following class(es)." In the box below that, you will need to fill it in with the URL of the class(es) you will be collaborating with.
Please make sure to check the box next to "Comment Approval." All comments on posts must be approved by teachers before they are made viewable by all participants.
11. User Settings will be up to each individual teacher. You can view those setting up by clicking on the Users tab.
12. Lastly, you will need to add your students to the account. You can do this one of three ways:
* Give each of your students the Class Signup Code found under the Gerenal tab in the Settings menu, and let
them add themselves to your account (This is the easiest way), or
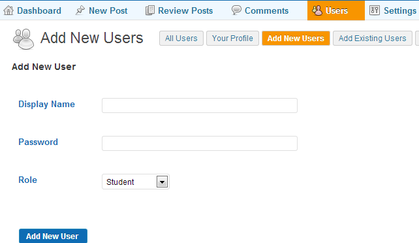
* You can add each of your students manually under the Add New Users tab in the Users menu, or
Please make sure to check the box next to "Comment Approval." All comments on posts must be approved by teachers before they are made viewable by all participants.
11. User Settings will be up to each individual teacher. You can view those setting up by clicking on the Users tab.
12. Lastly, you will need to add your students to the account. You can do this one of three ways:
* Give each of your students the Class Signup Code found under the Gerenal tab in the Settings menu, and let
them add themselves to your account (This is the easiest way), or
* You can add each of your students manually under the Add New Users tab in the Users menu, or
* You can add your whole class at once by using a plain-text file or spreadsheet with their display name and
password. More instructions for this method can be found under Bulk-Create Users tab in the Users menu
password. More instructions for this method can be found under Bulk-Create Users tab in the Users menu
Once you have fully created your class, take some time getting to know the site with your students. Encourage your students to practice creating posts and making comments. Just remember, you will need to approve each post and comment, so they will not be able to respond to each other until you do so. You will need to review a lot of posts during the practice period, but it is essencial for your students so that they will become comfortable with this blogging site. Please make sure you review the Trust & Monitor Policy with your students before they begin blogging.
If you have any questions about setting-up your class account on KidBlog, please fill out the Contact the Project Manager Form, and I will gladly assist you.
If you have any questions about setting-up your class account on KidBlog, please fill out the Contact the Project Manager Form, and I will gladly assist you.
KidBlog Tutorials
The following tutorials contain visuals and further explaination of the previous mentioned steps, and a demonstration of creating and manageing posts.
|
|
|
